Web Portal 2026 - Entra ID SSO Configuration
These instructions apply to TSplus Remote Access "Web Mobile" and Enterprise editions, versions 19.20.3.10 and later.
Please note that our new Web Portal 2026 is in beta and not ready for production use.
The Azure portion of this guide is intended as an example only. Managing and configuring your Azure environment is outside the scope of our support.
Please note that SSO authentication is currently supported only when users log in through your SSO portal. SSO will not be used if users go directly to the Remote Access server login page.
This is a complement to our official documentation:
https://docs.tsplus.net/tsplus/web-portal-with-sso/
High Overview Steps
Azure portal Configuration
Configure an enterprise application in Azure for using SAML
Assign the Azure enterprise application to users
Remote Access Server Configuration
Enable Web Portal 2026
Update appsettings.json
Import the SSL certificate from Azure
Map user credentials from Entra ID to local Windows accounts
Log in
Direct users to the Azure Apps portal to log in
Troubleshooting codes
Azure Portal Configuration
Configure an Enterprise Application in Azure for using SAML
Please note that these steps may require Cloud Application Administrator or Application Administrator permissions in Azure.
Log on to the Microsoft Entra Admin Center: https://entra.microsoft.com/
In the left Column, click Enterprise Apps
On the top tab, select “New Application.”
On the top tab, select “Create Your Own Application.”
Name your app anything you want. The name will be visible to your end users.
Select “Integrate any other application you don't find in the gallery (Non-gallery).”
Click Create (at the bottom)
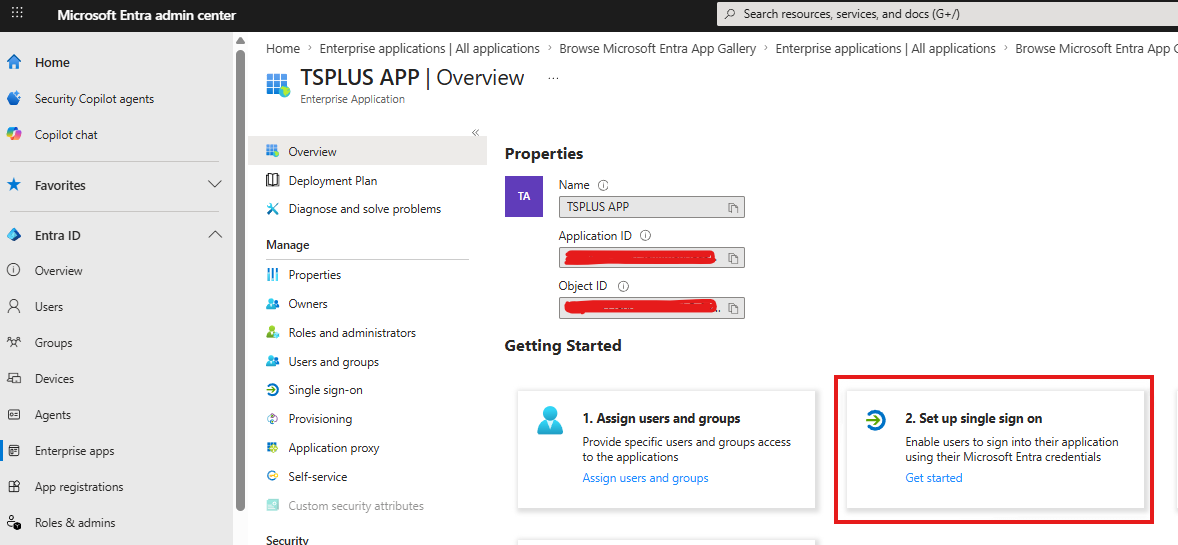
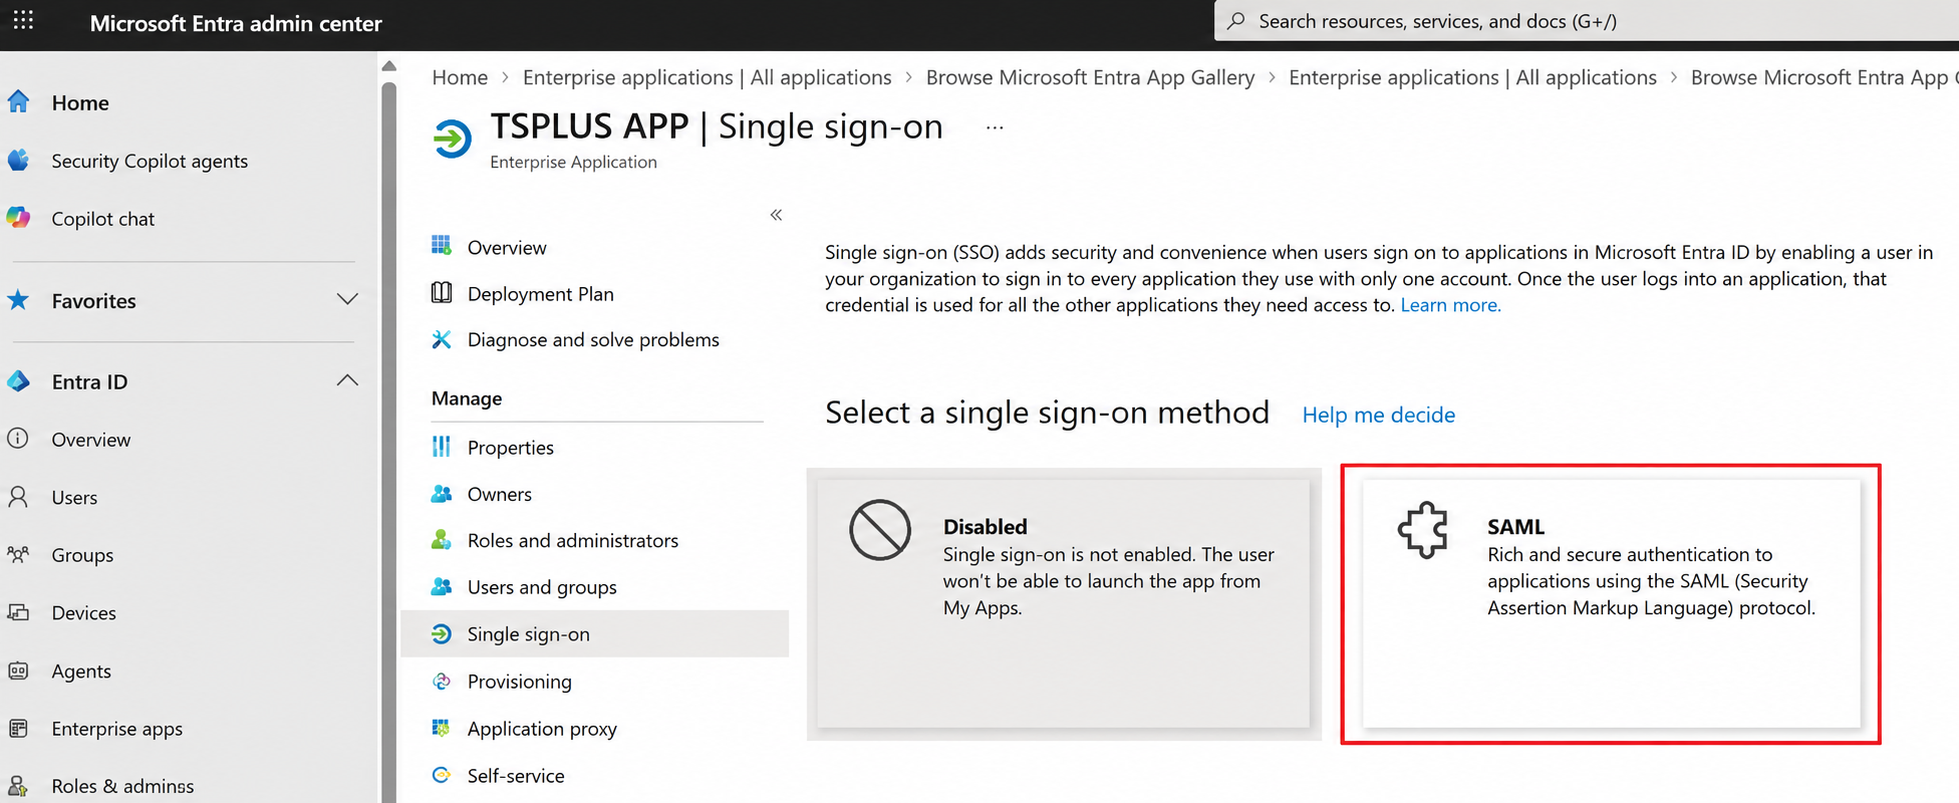
In your newly created enterprise application, while on the Overview screen, select “Set up single sign-on,” then choose SAML (see screenshots).
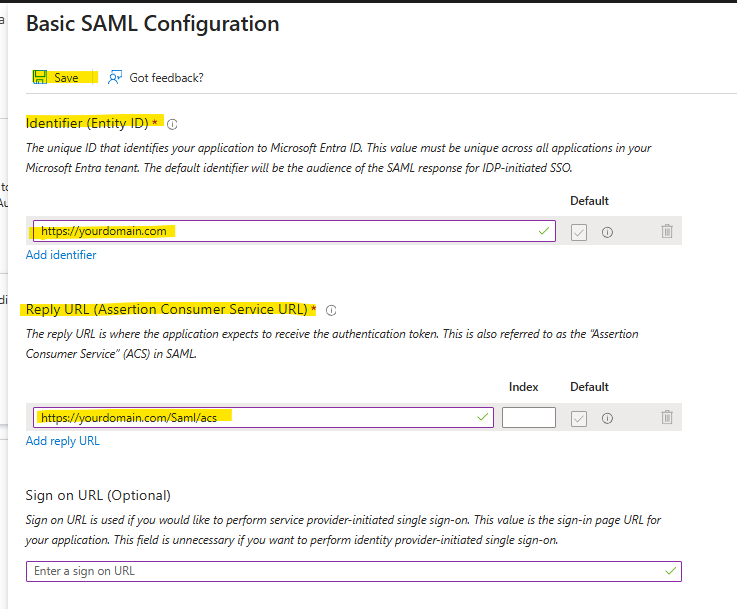
Edit the Basic SAML Configuration: In these examples, replace https://yourdomain.com with the actual URL of your Remote Access server.
Identifier (Entity ID): Enter the URL of your Remote Access server. For example, https://yourdomain.com. Save what you entered here for later use; it will be referenced in a later step.
Reply URL (Assertion Consumer Service URL): Enter your domain name, followed by /Saml/acs. For example, https://yourdomain.com/Saml/acs
Click Save; the other fields are not required
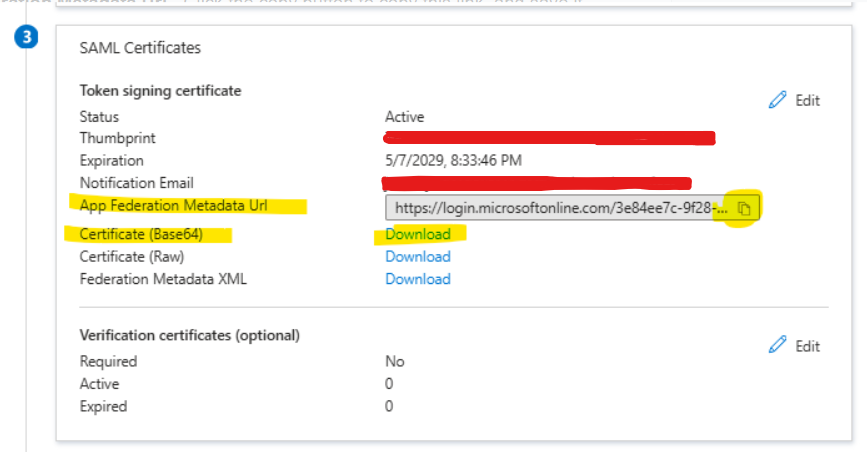
Get the following from the SAML Certificates section
App Federation Metadata URL - Click the copy button to copy this link, then save it somewhere you can access it later.
Certificate (Base64) - Download this SSL certificate, and copy this SSL certificate to your C:\Program Files (x86)\TSplus\Clients\webportal\ directory. If you have a TSplus Remote Access farm, this would be the webportal directory on your gateway server.
Leave the Attributes & Claims section of the Single Sign-On configuration to the defaults

Assign the Azure Enterprise Application to Users
Please note that these steps may require Cloud Application Administrator or Application Administrator permissions in Azure.
Log on to the Microsoft Entra Admin Center: https://entra.microsoft.com/
In the left Column, click Enterprise Apps, then click the application name you created in the previous section above.
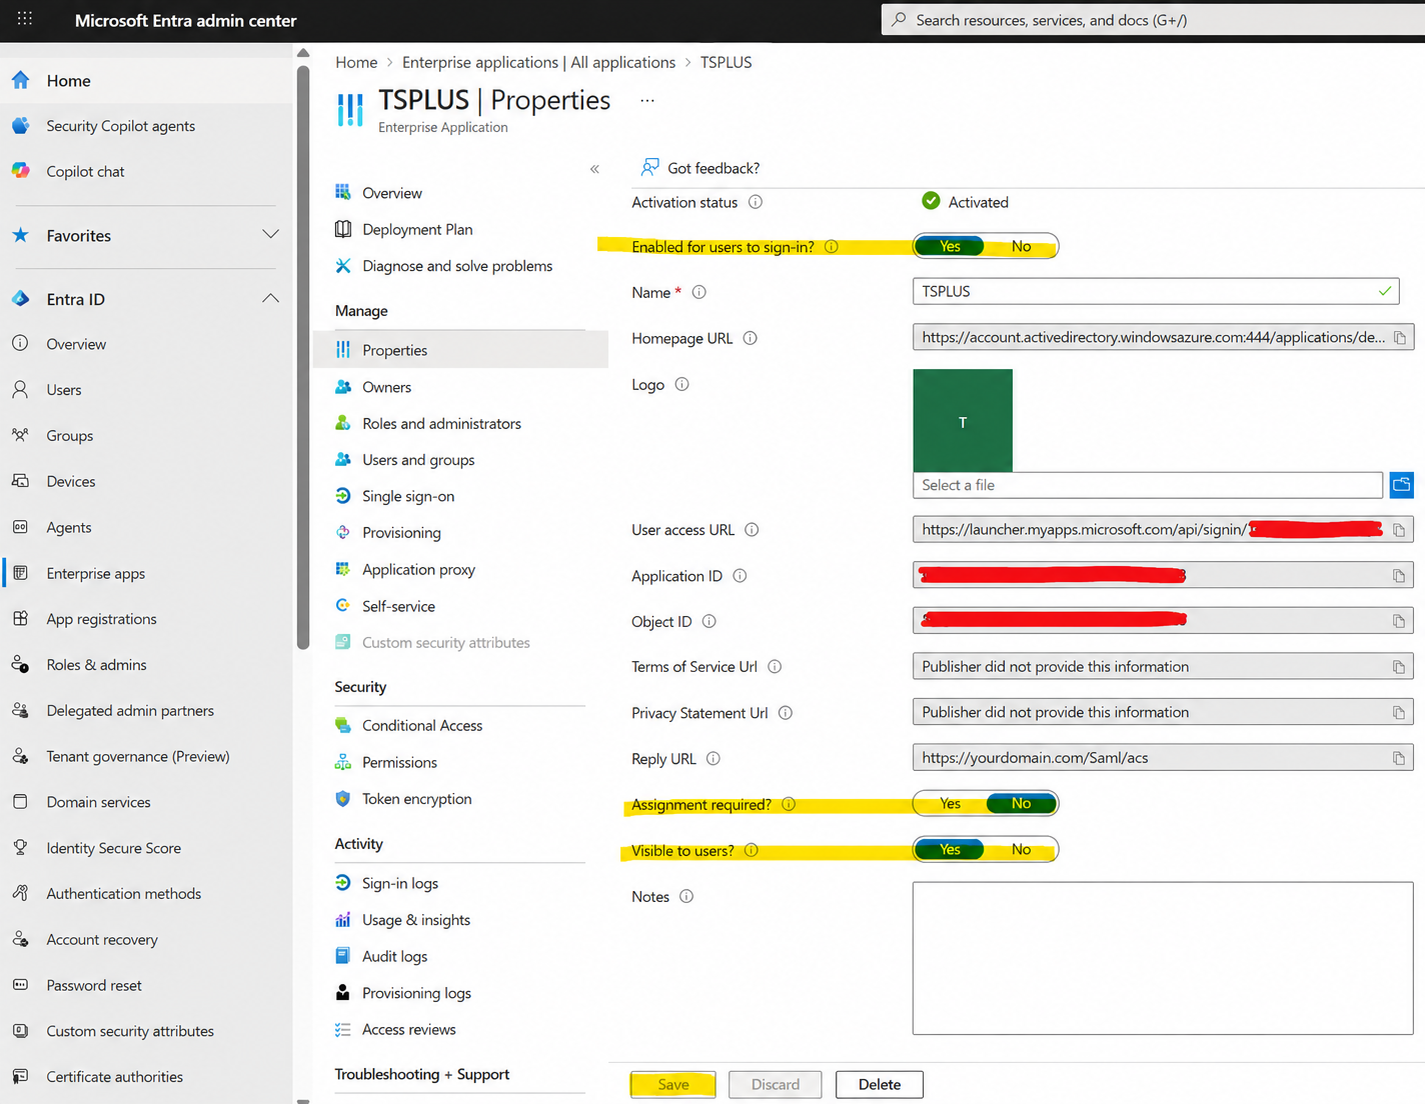
Click Properties:
Enabled users to sign in: Set this to yes
Assignment required: Set this to no. This will enable all Azure accounts to log in from the Azure Apps Portal. If you decide you want to restrict this to just selected users, choose yes instead. Please note that if you select yes, you may need to go to the Users and groups section of your enterprise application, manually add each user, and maintain this list.
Visible to users: Set this to yes, so that the enterprise application is visible in the Azure Apps Portal
The settings above are the default; if you need to change anything, click the Save button.
Remote Access Server Configuration
Enable Web Portal 2026
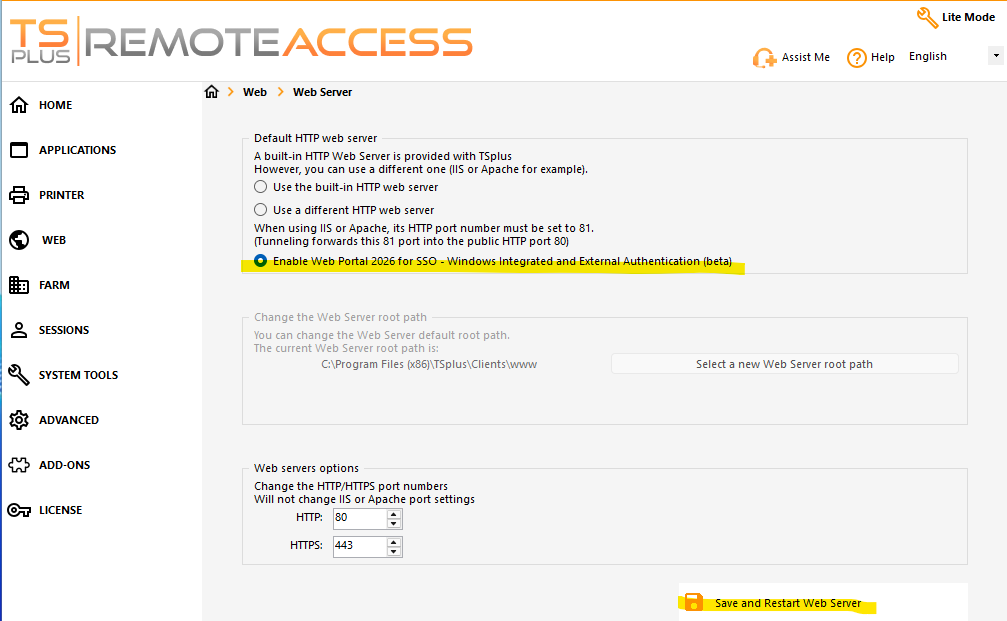
Go to AdminTool > Web > Web Server
Select “Enable Web Portal 2026 for SSO…”
Click the Save and Restart Web Server button
Update appsettings.json
Please note that if you have a TSplus Remote Access farm, this appsettings.json configuration is configured on the gateway only.
In this example, we assume that your TSplus Remote Access installation directory is C:\Program Files (x86)\TSplus. If your TSplus folder name is different, just replace TSplus with your installation folder name.
Make a backup of C:\Program Files (x86)\TSplus\Clients\webportal\appsettings.json for safekeeping.
Edit your appsettings.json file. Please note that in previous steps, you were asked to save information for later. If you need to gather this information again, it's in the Microsoft Entra Admin Center (https://entra.microsoft.com/) > Enterprise Apps > All Applications > (click your app name) > Single Sign-On section.
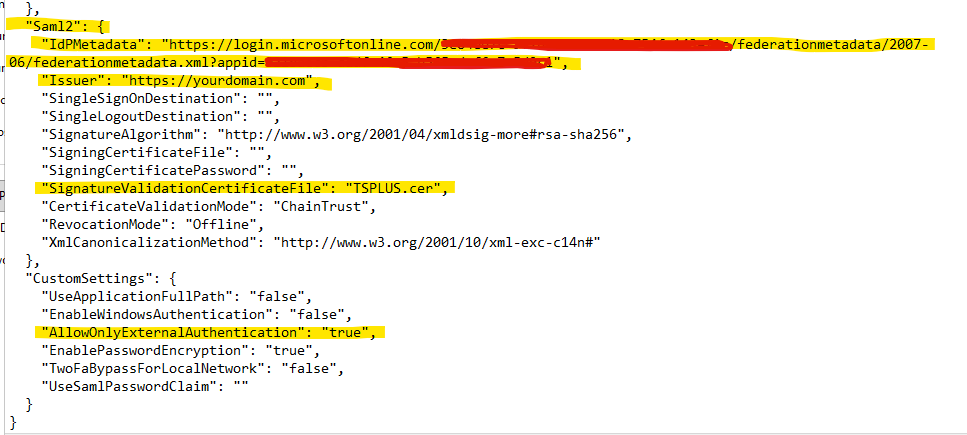
Saml2 section of appsettings.json - Please see screenshot below for an example of this completed section
IdPMetadata: In the previous section, “Azure portal Configuration” > “Configure an enterprise application in Azure for using SAML” > “Get the following from the SAML Certificates section step” step A, it asked you to copy the “App Federation Metadata Url” from the Azure portal. Paste this URL into this field.
Issuer: This must match the Identifier (Entity ID) in the Azure Single-Sign On section. In the previous section, it's the “Azure Portal Configuration” > “Configure an Enterprise Application in Azure for using SAML” > Step 5 > A. Typically, this would be the URL of your Remote Access server.
SignatureValidationCertificateFile: In the previous section above “Azure portal Configuration” > “Configure an enterprise application in Azure for using SAML” > “Get the following from the SAML Certificates section step” step B, it asked you to download an SSL certificate and place it in your webportal directory. Enter the name of this SSL certificate file, including the file extension (.cer).
CustomSettings section of appsettings.json
AllowOnlyExternalAuthentication: Set this to true
Restart the Windows Service named “Web Portal Service.”
Import the SSL certificate from Azure
Navigate to the SSL certificate you just copied to the C:\Program Files (x86)\TSplus\Clients\webportal\ directory, then right-click it and select "Install Certificate."
Select “Local Machine”, then click Next
Select “Place all certificates in the following store,” then browse to Trusted Root Certification Authorities, then click OK and Next, then Finish.
Click OK on all remaining windows
Map user credentials from Entra ID to local Windows accounts
Create a local Windows user account for each individual Entra ID user on the Remote Access server. Look at the UPN for each user account in Entra ID. Everything before the “@” symbol is considered the username. For example, if you had a user with the UPN johndoe@mycompany.com, then create a local Windows account on the Remote Access server named johndoe. SSO only works with local accounts at this time. If you have a TSplus Remote Access farm, please ensure this account is created on every server in the farm, including the gateway, and that the password is the same.
- Save the credentials in the Windows credentials store for each local Windows user account you created using our AdminTool.exe /windowscredential-addorupdate command. If you have a TSplus Remote Access farm, this command is required only on the gateway server. See documentation for reference:https://docs.tsplus.net/tsplus/commands-list/#add-or-update-credentials-to-the-windows-credentials-manager-windowscredential-addorupdate
Assign the local user to an Application on the AdminTool > Application screen. User assignments are mandatory when using Web Portal 2026. If you have a farm, this would have to be done on your gateway, which will then automatically push it down to your application servers.
Login
Direct users to the Azure Apps portal to log in
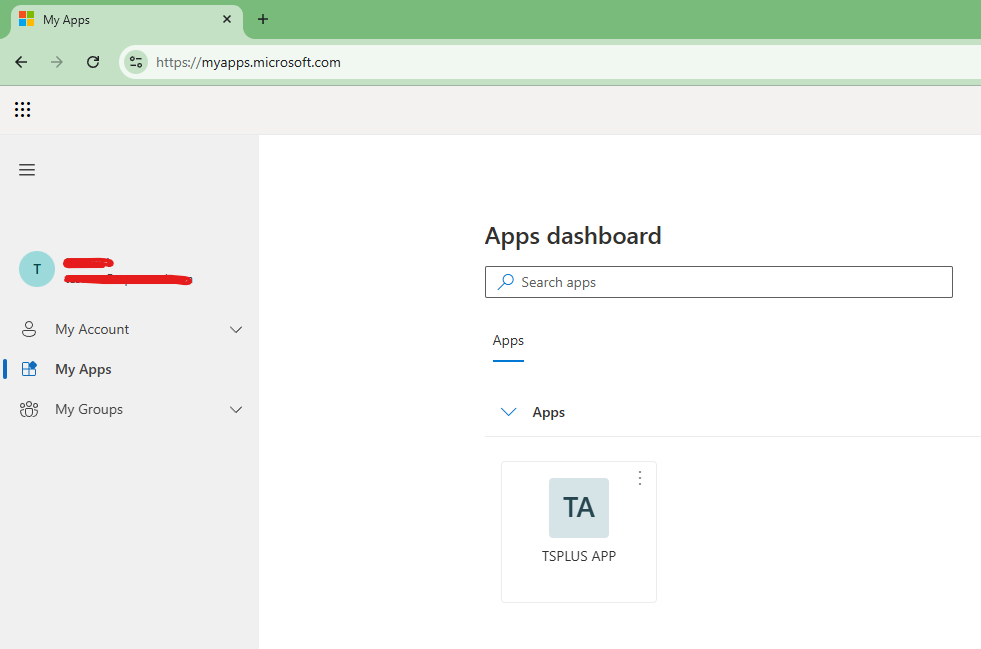
Advise users to go to their Azure App Portal located at https://myapps.microsoft.com/
Ask the user to click the application corresponding to your TSplus Remote Access server (which you created in the “Azure Portal Configuration” > “Configure an Enterprise Application in Azure for using SAML,” step 3 section above).
They will be redirected to the login using Azure
User will be redirected to yoru Remote Access server in an authentication session
If the app is not listed there, users can re-add it by clicking on Add apps, and entering the URL you provide them, which woudl be the "User access URL" found on the Microsoft Entra Admin Center > Enterprise Apps > (click Your App name) > Properties screen.
Troubleshooting
Below is a list of error codes or other messages that you may see in your Remote Access web portal. Additional clues may be in the log located at C:\Program Files (x86)\TSplus\Clients\webportal\WebPortal.log.
- 1407: The matching local Windows user account was not found. The expected local Windows username must match the part of the user’s UPN before the @ symbol in Okta or Entra ID. For example: john.smith@example.com The local Windows account should be: john.smith. Also, verify that the required AdminTool command was run to add the user’s credentials to the local credentials store.
- 1408: The IdP’s SSL certificate is not trusted by the Remote Access server. Import the IdP SSL certificate into the Local Computer > Trusted Root Certification Authorities store. You can open it by running: certlm.msc
- 1415: The user accessed the Remote Access login page directly instead of starting the login process from the SSO portal. Also, you can see this if the local user account that matches the Entra ID account before the "@" does not exist, or if there was a syntax error for the AdminTool.exe /windowscredential-addorupdate command. Please note that the server's hostname should be in the MACHINE-NAME field

- "No application is currently assigned to you." User assignments are now mandatory in the beta web portal. Please assign an applicaiton to a user. If you have a TSplus Remote Access farm, please make the assignment on the gateway server.