
Overview
After the Remote Access server has been properly joined to Microsoft Entra ID, Entra users must be made available to TSplus for user and application assignments.
Because individual Microsoft Entra joined users cannot be browsed or assigned directly in the TSplus AdminTool, this guide explains how to add Entra users to local Windows groups and then use those groups for TSplus assignments, such as published applications and Two-Factor Authentication.
The remainder of this guide covers the configuration required for each supported connection method:
- MSTSC / RDP using Microsoft Entra web-account authentication
- Generated Connection Client (.connect) using Microsoft Entra authentication
- HTML5 / Web Portal
- Two-Factor Authentication
Prerequisites
To follow this guide, you will need an up-to-date TSplus Remote Access server, administrative access to the server, and an eligible Microsoft Entra ID user account, based on the server’s Microsoft Entra join configuration. The Remote Access servers must be either Microsoft Entra joined or Microsoft Entra hybrid joined.
This guide does not apply to Microsoft Entra Domain Services. Entra Domain Services is a separate service that uses traditional Windows domain authentication and is different from Microsoft Entra Join and Microsoft Entra Hybrid Join.
Microsoft Entra joined: Supports cloud-only Entra ID users from the same tenant. External/B2B guest accounts are not supported.
Microsoft Entra hybrid joined: The server remains joined to traditional Active Directory. Users must have an on-premises AD account synchronized to Entra ID. The user account must exist in AD and Entra ID. Cloud-only and external/B2B guest accounts are not supported.
If the TSplus server must authenticate any cloud-only Entra users, it must be Microsoft Entra joined only and cannot be a member of traditional Active Directory or be Hybrid Joined.
To join a Windows 10/11 Pro computer directly to Microsoft Entra ID (Microsoft Entra joined), see:
https://support.tsplus.net/a/solutions/articles/44002201969?lang=en
Supported Windows Server editions hosted in Azure can be Microsoft Entra joined using the AADLoginForWindows extension. This is only available for VMs hosted in Azure.
For Windows Server editions not hosted in Azure, direct Microsoft Entra Join is not supported. If the server is joined to an on-premises Active Directory domain, use Microsoft Entra Hybrid Join instead. If the server is neither hosted in Azure nor joined to Active Directory, it cannot be joined to Microsoft Entra ID, so the instructions in this guide do not apply.
Below are Microsoft’s guides for configuring a Microsoft Entra Hybrid Joined computer for reference:
- https://learn.microsoft.com/en-us/entra/identity/devices/how-to-hybrid-join
- https://learn.microsoft.com/en-us/entra/identity/devices/hybrid-join-plan
Hybrid Join note: Hybrid Entra authentication requires Microsoft Entra Kerberos to be configured for the AD domain. If you receive an error that the Azure AD Kerberos Server object is missing, install the AzureADHybridAuthenticationManagement module and create the object with Set-AzureADKerberosServer. See Microsoft’s configuration guide below:
Create a local group to hold Entra ID users
- From Computer Management > Local Users and Groups > Groups, click More Actions on the right lateral menu bar, and then Create Group.
- Then, type a name, such as “External TSplus Users,” and a short description, as shown below, and click on Create to create the local group.

Note: It is not possible to add the Entra ID users to this local group at this point.
Add Entra ID users to the local group
For a Microsoft Entra-joined server, Entra users cannot be assigned directly in the TSplus AdminTool. Add the users to a local Windows group first, then assign that group to applications or Two-Factor Authentication.
Open CMD or PowerShell as Administrator and run:
net localgroup "<LOCAL GROUP NAME>" "AzureAD\<ENTRA ID UPN>" /add
Example:
net localgroup "External TSplus Users" "AzureAD\azuretest@domain.com" /add
For a Microsoft Entra Hybrid Joined server, this step is not normally required. Hybrid users also exist as on-premises Active Directory users and can be assigned directly to TSplus applications and Two-Factor Authentication.
If desired, Hybrid Joined users can still be added to a local group using their Active Directory account:
net localgroup "External TSplus Users" "DOMAIN\username" /add

Assign local group to a published application
Link to documenation on this topic:
https://docs.tsplus.net/tsplus/assigning-applications-to-users-or-groups/
Create a local group to hold Entra ID accounts for our 2FA Add-On
You may skip this section if you do not use our 2FA Add-On
- From Computer Management > Local Users and Groups > Groups, click on More Actions on the right lateral menu bar, and then Create Group.
- Then, type a name, such as “Two Factor Authentication,” and a short description, as shown below, and click on Create to create the local group.

Note: It is not possible to add Microsoft Entra-joined Entra ID users to this local group at this point.
Add Entra ID users for our 2FA Add-On to a local group
You may skip this section if you do not use our 2FA Add-On
For a Microsoft Entra-joined server, Entra users cannot be assigned directly in the TSplus AdminTool. Add the users to a local Windows group first, then assign that group to applications or Two-Factor Authentication.
Open CMD or PowerShell as Administrator and run:
net localgroup "<LOCAL GROUP NAME>" "AzureAD\<ENTRA ID UPN>" /add
Example:
net localgroup "Two Factor Authentication" "AzureAD\azuretest@domain.com" /add
For a Microsoft Entra Hybrid Joined server, this step is not normally required. Hybrid users also exist as on-premises Active Directory users and can be assigned directly to TSplus applications and Two-Factor Authentication.
If desired, Hybrid Joined users can still be added to a local group using their Active Directory account:
net localgroup "Two Factor Authentication" "DOMAIN\username" /add

Activating 2FA authentication for Entra ID user
You may skip this section if you do not use our 2FA Add-On
- Open the Two-factor Authentication Administration program (available from the AdminTool > Addons)
- From Manage Users, click on Add Groups to enable two-factor authentication for the local group previously created. A pop-up named “Select Users or Groups” opens.
- Enter the name of the local group holding the external users enabled for two-factor authentication. Click OK.

- As a result, the local group is added to the list.
Enabling 2FA authentication
You may skip this section if you do not use our 2FA Add-On
Overview
The following steps describe how the user will enroll in two-factor authentication from the Web browser. These steps are not specific to external users.
- From the Web browser, the user connects to the TSplus Web portal, enters their credentials, and clicks Log in.

Note: the domain field is not the name of the local machine, but the name of the Azure Active Directory domain.
- The user is prompted to enroll in two-factor authentication following a successful login.

- As a result, the user azuread\azuretest is displayed as enrolled in the Two-Factor Authentication Administration program, in the Manage Users tab:

- Following its next successful login on the TSplus Web portal, the user azuread\azuretest will be required to enter its verification code:

Connections Using MSTSC
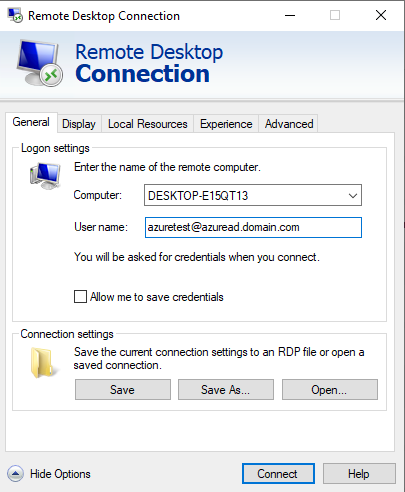
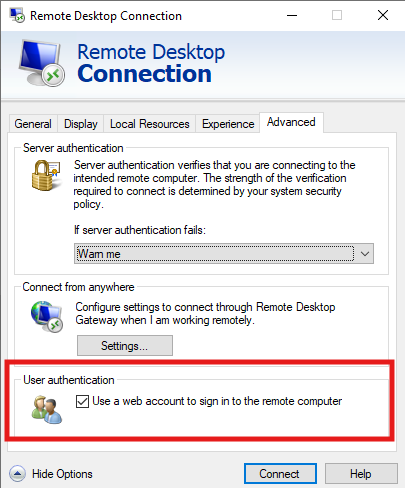
In the Advanced tab, you must tick the box ‘Use a web account to sign in to the remote computer’.
It is also essential to enter the HOSTNAME exactly as it appears in the Devices section of the Microsoft Entra admin center. The client computer must be able to resolve this hostname in DNS to the Remote Access server’s IP address.
Do not use the server’s IP address or a separate public/custom domain name. The computer name used for the connection must match the hostname registered for the device in Microsoft Entra ID.
https://learn.microsoft.com/en-us/windows/client-management/client-tools/connect-to-remote-aadj-pc
Connections Using Our Generated Client (.connect file)
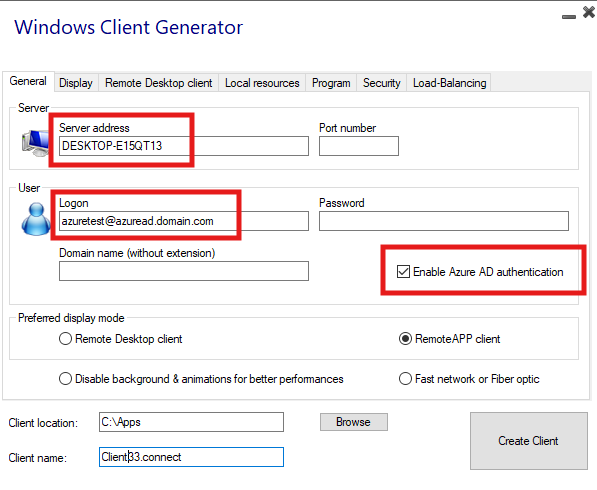
You must also enter the server's HOSTNAME and tick the ‘Enable Azure AD authentication’ box.
It is also essential to enter the HOSTNAME exactly as it appears in the Devices section of the Microsoft Entra admin center. The client computer must be able to resolve this hostname in DNS to the Remote Access server’s IP address.
Do not use the server’s IP address or a separate public/custom domain name. The computer name used for the connection must match the hostname registered for the device in Microsoft Entra ID.
Connections Using HTML5 Client
Please go to AdminTool > Web > Web Portal Customization > Credentials > Domain Section > Default value, and enter AzureAD (or your NETBIOS domain name if you have a hybrid joined configuration). Save changes at the top-right.
You may need to clear your web browser cache for the change to take effect immediately.
To connect in HTML5 via the web portal, you must first add the Azure account to a group in your local AD on your TSPlus server and log in to the server with that account.
Important Note Regarding Usernames
The sAMAccountName cannot exceed 20 characters; this is a Windows limitation. If the SAMAccountName exceeds 20 characters, the username will be truncated.
https://learn.microsoft.com/en-us/windows/win32/ad/naming-properties
Troubleshooting and Support requests
The most relevant log file to collect when reproducing the issue is the Web portal log file.
- Go to AdminTool > License, and click the "Enable Troubleshooting Mode" button.
- Replicate the issue.
- Go to AdminTool > License, and click the "Export Logs..." button, then click the link to generate the logs and send us the resulting log files.
- Please include the username and the date/time of the login.